 Credit: Lucas Gouveia / Android Police
 By
Stephen Perkins
Updated
Jan 25, 2026, 3:15 PM EST
By
Stephen Perkins
Updated
Jan 25, 2026, 3:15 PM EST
Stephen is an author at Android Police who covers how-to guides, features, and in-depth explainers on various topics. He joined the team in late 2021, bringing his strong technical background in computers, smartphones, and customer service. As a power user, Stephen enjoys tweaking and customizing his devices to better suit his needs. He frequently installs custom ROMs, kernels, and recoveries to improve his Android experience beyond what stock can provide. He has followed the Android scene since its introduction in 2008 with the HTC Dream, also known as the T-Mobile G1. However, the Motorola Droid was his first official Android device in 2009, and that is where it all began. From there, he quickly learned about unlocking the bootloader and gaining full root access — changing his smartphone life forever. Stephen started his writing career in 2016 as a lesson plan writer for computer science and IT at Study.com. That led him to Gadget Hacks, where he wrote how-to guides for the Android rooting, modding, and custom ROM section. Now, he continues down that same path at Android Police to help as many people as possible learn more about technology.
Sign in to your Android Police account Add Us On Summary Generate a summary of this story follow Follow followed Followed Like Like Thread 1 Log in Here is a fact-based summary of the story contents: Try something different: Show me the facts Explain it like I’m 5 Give me a lighthearted recapSometimes, things go wrong, making your device's hardware and software experience less than ideal. It may be related to a new settings change or a glitchy system update.
Thankfully, the built-in Android recovery mode is a quick way to resolve those issues. Any budget-friendly Android phone can also access this feature, making it a universal solution that works with virtually any device.
Whether you want to perform a simple factory reset or clear the system cache, this guide shows you how to access Android recovery mode and outlines its features.
 Related
How to turn off Safe Mode on your Android phone or tablet
Related
How to turn off Safe Mode on your Android phone or tablet
Three easy ways to disable Safe Mode
Posts By Jon GilbertHow to boot into Android recovery mode
Getting your device to the Android recovery main menu is simple when you know how.
Depending on your device manufacturer, the process may differ slightly, but it should generally be the same.
The best method to get to the Android recovery menu is to turn off your device and then long press a button combination.
If Android recovery mode isn't working, meaning you can't access the menu, plug your device into a computer using a USB cable and then follow the steps below.
To boot your device into Android recovery mode, do the following:
- With your Android device on, long press the power button.
- Tap the Power off option. When your device is completely off, proceed to the next step.
- Hold the volume down and power buttons simultaneously to enter the bootloader menu, also known as Fastboot Mode. The easiest way is to long press the volume down button, and then long press the power key while still holding them.
- If you have a Samsung Galaxy phone, long press the volume up and power buttons, then release the power button when you see the Samsung logo to access the recovery menu screen.
- Navigate the menu with the volume keys to select the Recovery Mode option.
- Press the power button to confirm your choice. You'll notice a No command message and an Android icon with a red exclamation point. This is what you want to see at this point.
- While briefly holding the power button, quickly press the volume up button.
- You now have access to the Android recovery menu screen.
- Navigate the menu using the volume keys, then confirm your choice with the power button.
If you're familiar with Android Debug Bridge (ADB) commands, quickly access your recovery menu using the following shortcut.
Enter the adb reboot recovery command to launch the recovery mode when connected to a computer.
You don't need to press a key combination or scroll through the bootloader menu for the Recovery Mode option.
How to turn off Android recovery mode
To exit Android recovery mode, use the volume buttons to navigate to the Reboot system now option, then press the power button to confirm.
Your device will restart and exit recovery mode.

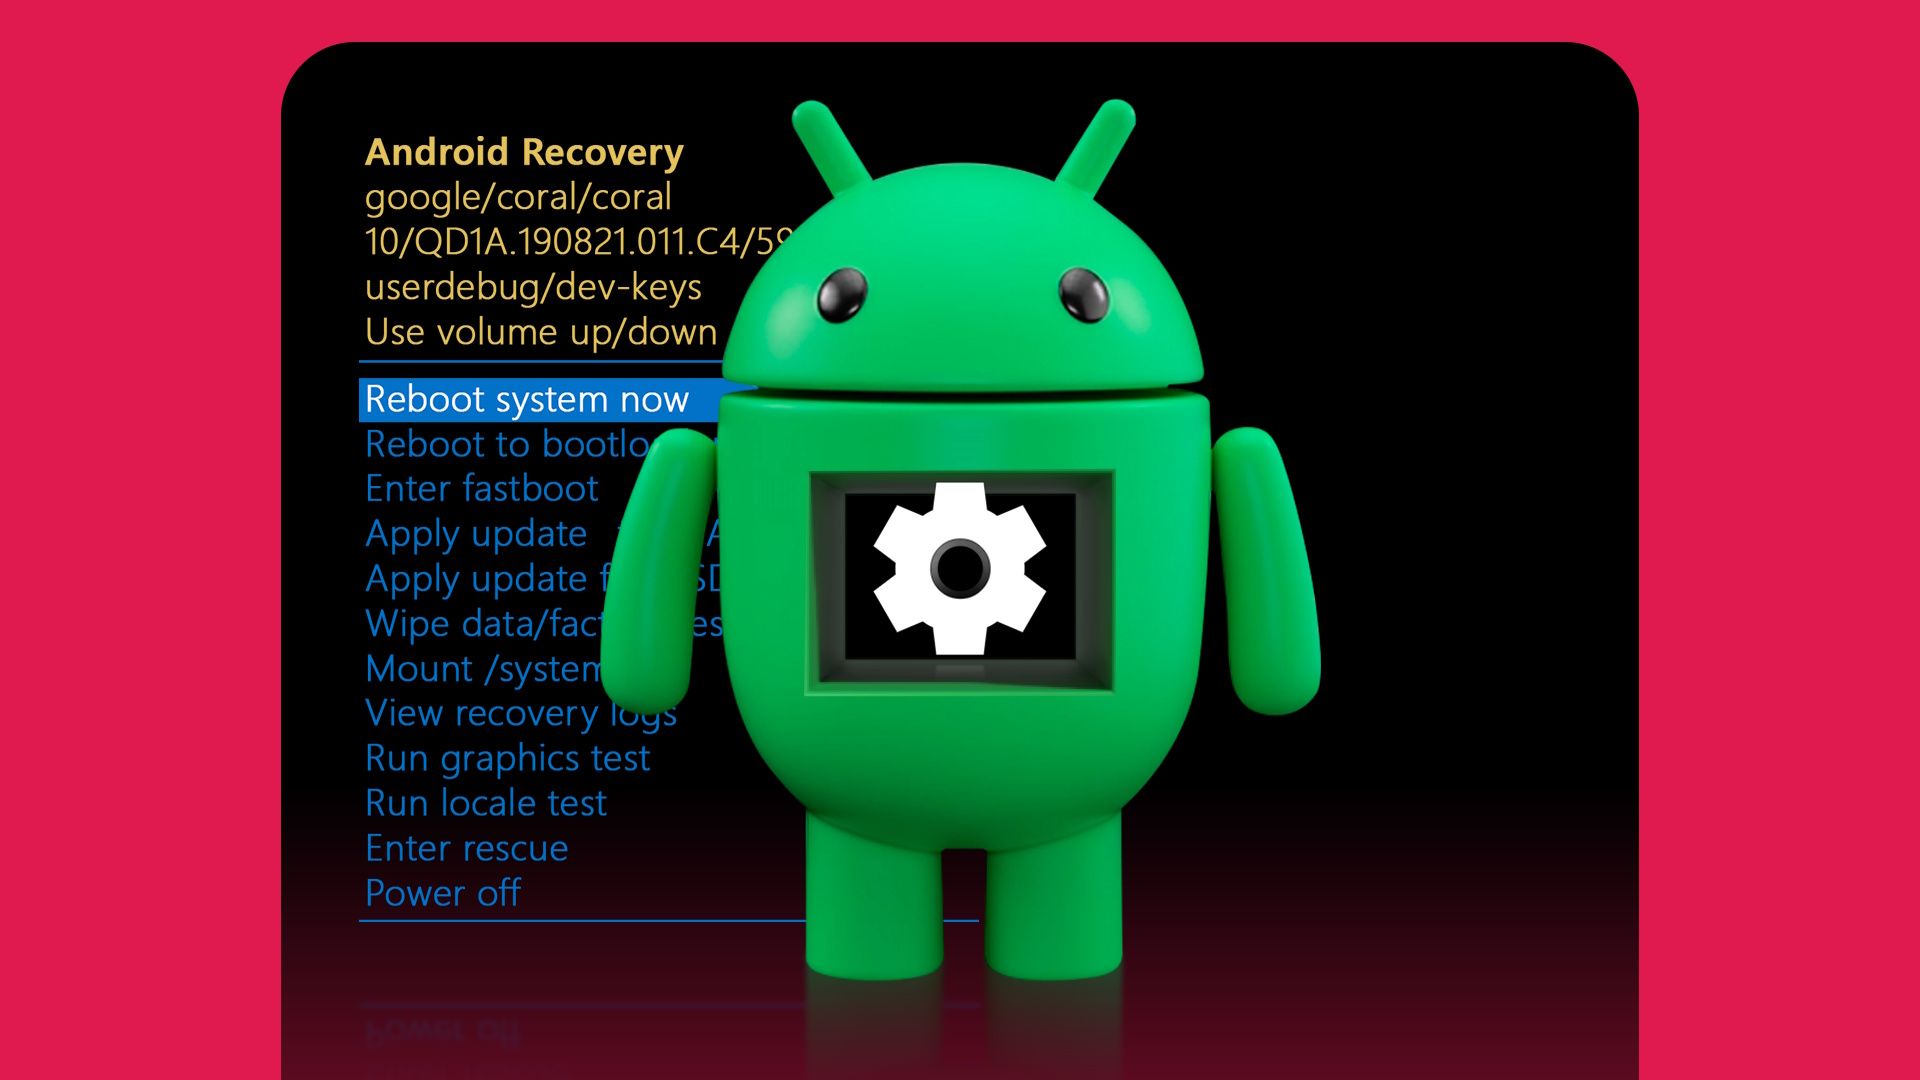
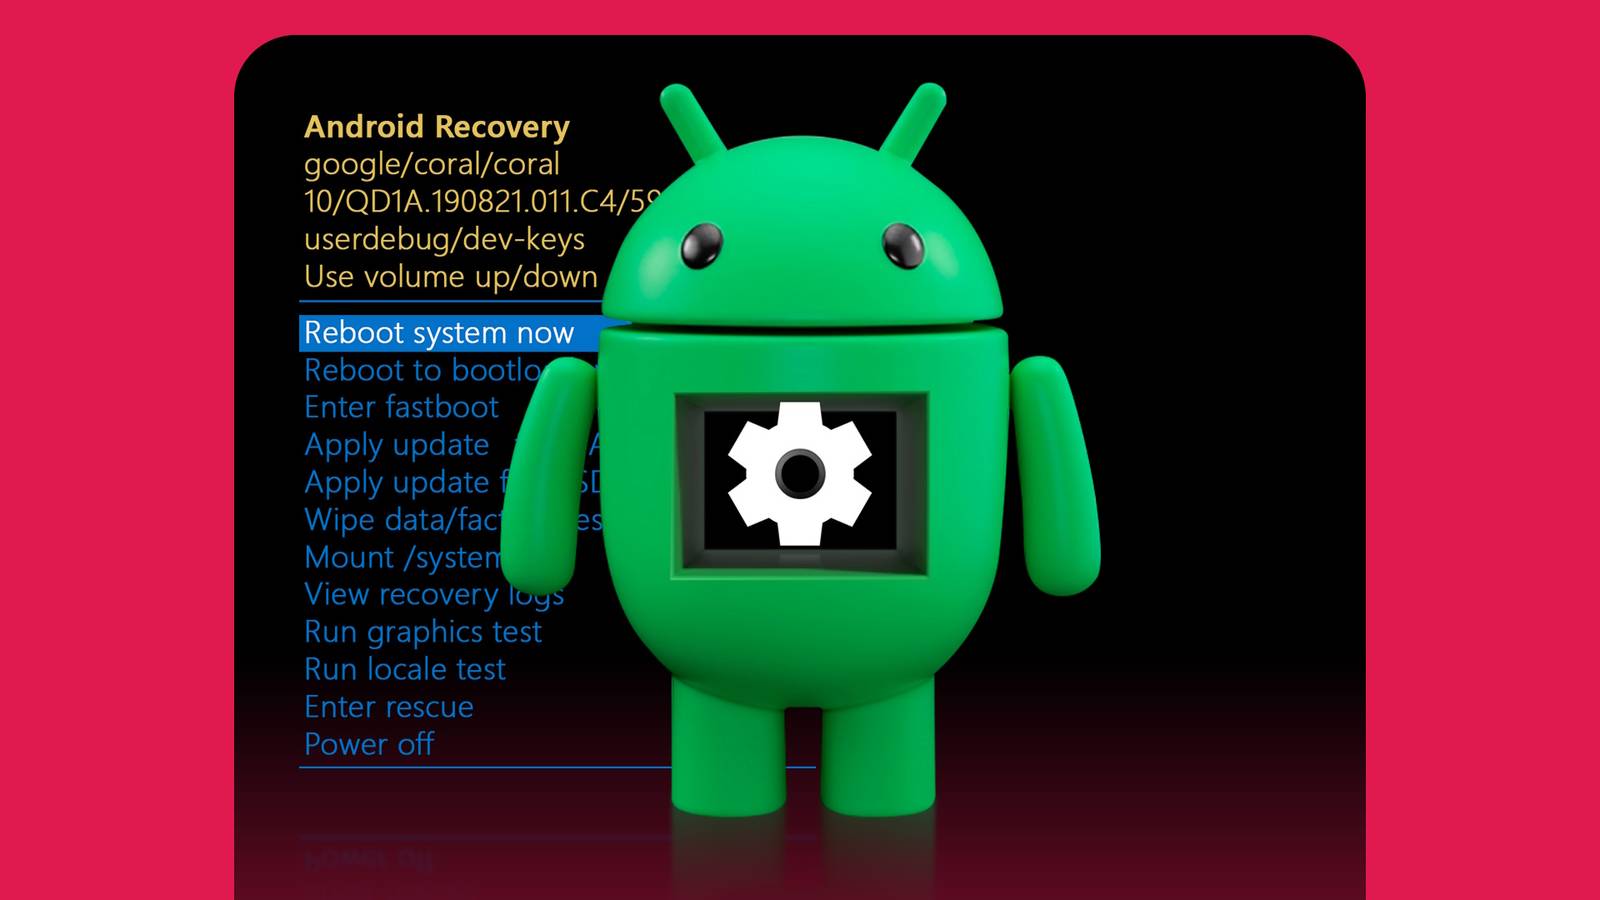
The common Android recovery mode features
Now that you can access the Android recovery mode screen, it's time to learn some of its core features and what they can do.
Many Android recovery mode features are standard, so you'll see them regardless of your manufacturer.
We break down the general Android recovery mode features commonly found on most smartphones.
Depending on the manufacturer and Android version, some devices have unique features that are not found elsewhere.
For example, you may see the Repair apps option on an older Samsung Galaxy phone, but not on a newer one.
For when you're troubleshooting, selling, or trading in your phone
Posts 2 By Jon Gilbert'Reboot system now' quickly restarts your device
When you use the Reboot system now option, your device reboots like usual. Simply put, this lets you return your phone to its original state.
'Reboot to bootloader' is useful for advanced commands
You may have been in the bootloader when you selected the Recovery Mode option the first time.
If you plan to use more advanced features after this, such as Fastboot commands, reboot into the bootloader first.
'Enter fastboot' is where you can use Fastboot commands
The Enter fastboot option opens the separate fastboot menu.
Using the fastboot menu helps you install custom firmware or ROMs without requiring a custom recovery. This feature is primarily for advanced users and has a particular use case.
When you select Enter fastboot, you can reboot your device, return to the recovery screen, reboot to the bootloader, or power off again. However, you'll usually use the regular bootloader or Fastboot mode for most of your needs.
'Apply update from ADB' is an advanced way of installing updates
The Apply update from ADB option is helpful if your device manufacturer lets you download firmware updates. Using this feature, you can bypass the built-in system update process.
If you know how to use ADB commands, sideloading a system update is a fast and reliable method to update your device.
'Apply update from SD card' installs updates stored on the device
Similar to the Apply update from ADB option, the Apply update from SD card option lets you install updates from your on-device storage.
If you're uncomfortable using ADB commands and your device manufacturer allows you to download system update files, this is a great way to manually update your device.
'Wipe data/factory reset' removes all on-device data and accounts
The Wipe data/factory reset option is one of the most commonly used, as it lets you perform a full factory reset on your device.
It functions similarly to the factory reset option in the Settings app, but in recovery mode.
But you'd still like the option, especially if your device doesn't boot into Android. The Wipe data/factory reset option could bring it back to life without requiring you to access all the software.
As long as you can access the recovery menu, you can factory reset your device whenever needed.
'Wipe cache partition' helps if your apps crash a lot
You might see the Wipe cache partition option on some devices, such as Samsung Galaxy phones, which lets you wipe your system cache.
When many apps are installed, your system cache or temporary app files can bog down your device. This is especially true the longer you use it without clearing the cache.
The Wipe cache partition option lets you start fresh, which can often fix crashing apps or slow-to-open ones.
 Related
How to clear app cache on Android and why you should
Related
How to clear app cache on Android and why you should
It's not a miracle cure, but it does have its uses
Posts 4'Mount /system' is perfect for advanced users
The Mount/System option lets you mount your device's system file to view it and make any necessary changes.
The feature is helpful for advanced users. Only use this option if you know what you're doing, as it mounts the /system partition of your device.
However, your system files are only altered if you manually change them. Selecting the feature won't harm your device.
'View recovery logs' keeps track of your user actions
The View recovery logs option is useful if you spend more than a few minutes in recovery mode.
You can view a temporary log with a timestamp of your actions during that recovery session.
It can be helpful if you need to remember what you did earlier, especially when installing system image files.
'Run graphics test' can identify display issues
The Run graphics test option runs a quick test on your device. It ensures its on-device graphics and display function as they should.
The Run graphics test option also runs through recovery mode-related visual tests, which take a few seconds to complete.
AP Recommends: Subscribe and never miss what matters
Tech insights about everything mobile directly from the Android Police team. Subscribe By subscribing, you agree to receive newsletter and marketing emails, and accept Valnet’s Terms of Use and Privacy Policy. You can unsubscribe anytime.This option might look like it's wiping your device's data or installing an update, but it isn't.
'Run locale test' is another visual method to test your display
This simple visual test shows the languages your device can display on-screen.
The Run locale test option is an extension of the Run graphics test option. It lets you see different languages displayed with their default messages.
'Power off' is a simple but useful option
If you don't plan to use the device after this, the option puts it into a powered-off state.
You likely won't use the Power off option much on your primary device, but it's there if you need it.
'Repair apps' can help fix any app that may not be working correctly
You'll see the Repair apps option on older Samsung devices. It allows you to re-optimize your apps, just like after installing a system update. Doing so is helpful if your apps slow down or give you other issues.
Optimizing your apps using the Repair apps method can return them to peak performance. As a bonus, it may fix problems with your installed apps.
However, if you're using a newer Samsung device (One UI 6.1 and Android 14 or later), the repair option has been quietly discontinued.
The Android recovery mode on your device gives you peace of mind
Your Android device may not always boot up correctly, and your apps can occasionally act up without warning.
Sometimes, system updates can also cause more harm than good, leading to battery drain or other system-related issues. The Android recovery mode feature helps when you encounter these problems.
If you can't boot to your Android lock screen, a factory reset from the recovery menu may resolve the issue.
Before it gets this far, learn how to back up your Android device painlessly to secure your data.
Follow Followed Like Share Facebook X WhatsApp Threads Bluesky LinkedIn Reddit Flipboard Copy link Email Close Trending Now How to roll back to an older version of an app on Android
 Google is finally tackling Android’s Do Not Disturb problem